UI basic functions are ready
Category Archives: Navigator
Navigator 2: Install Navit
Navit is a free and open-source car navigation that support for various vector map formats. Is written in C/C++ and can run on a wide range of machines, included Raspberry Pi.
Installation:
Before start the installation, be sure to have the GPS module connected and working on your Raspberry Pi (previous post).
- turn on the raspberry and open the terminal
- update with sudo apt-get update and sudo atp-get upgrade
- configure GPS listeners from boot: sudo nano /etc/rc.local
- copy those commands:
- sudo systemctl stop gpsd.socket
- sudo systemctl disable gpsd.socket
- sudo gpsd /dev/serial0 -F /var/run/gpsd.sock
- save and reboot
- open terminal and type: sudo apt-get install navit
- download a map (.bin), use Planet Extractor, quick and simple (you can use Garmin maps too)
- copy the map inside /home/pi/navit directory (you can rename it with a shorter name)
- navigate to /etc/navit
- open the navit.xml file: sudo nano navit.xml
- search for the line <mapset enabled=”yes”> … </mapset> and change yes to no
- now look for the line after: <!– Mapset template for openstreetmaps –>
- in the line after, set your map path instead of: “media/mmc2/Mapsnavit/osm_europe.bin”
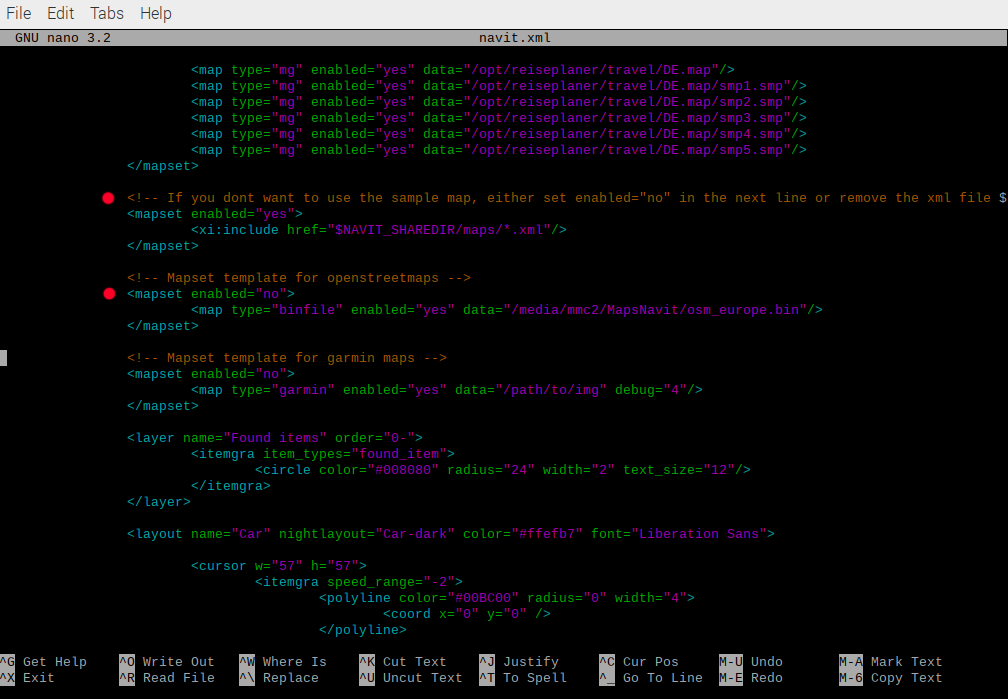
- save and close
- start Navit
More information about configurations can be found here: Navit Wiki
Navigator 1: Connect GPS Module
Requirements:
- GY-NEO6MV2 GPS (or other GPS module, IO ports are similar)
- Raspberry Pi
- some cables
Before start, be sure that the GPS Module is near a window or better outside, indoor could take more time to get the satellite signal or even not signal at all.
Connections: GPS Module < – > Raspberry Pi
- GND < – > GND
- VCC < – > 5v or 3v3 (depend on your module)
- RX < – > TDX (pin 8)
- TX < – > RXD (pin 10)
Open Raspberry Pi IO ports
- start Raspberry
- open terminal and type raspi-config
- select Interfacing Options
- select Serial
- say NO to ssh over serial
- say YES to serial port hardware
- select OK
- select Finish
- reboot
Get data from the GPS module
- start raspberry
- open terminal and type sudo apt-get install gpsd gpsd-clients
- type cat /dev/serial0
- you should get a cyclic NMEA sentences output like the following:
$GPRMC,235316.000,A,4003.9040,N,10512.5792,W,0.09,144.75,141112,,*19
$GPGGA,235317.000,4003.9039,N,10512.5793,W,1,08,1.6,1577.9,M,-20.7,M,,0000*5F
$GPGSA,A,3,22,18,21,06,03,09,24,15,,,,,2.5,1.6,1.9*3E
Now you can start to install Navit or use the gpsd daemon to test the received data:
- on the terminal type sudo gpsd /dev/serial0 -F var/run/gpsd.sock
- sudo gpsd -s
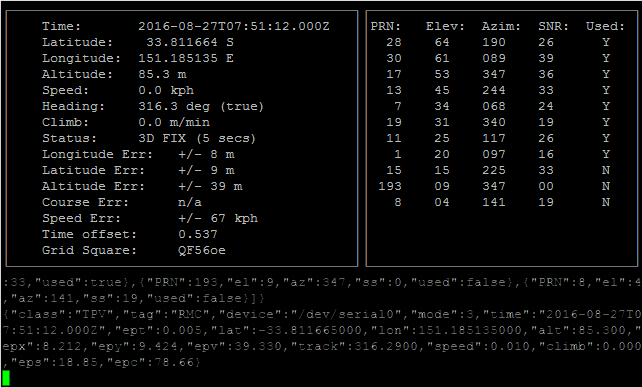
- sudo gpsmon
You should get a more readable output, something like:
Sprinter Computer Board Planning
Project objective: create a board computer for a camper van
Primary Functions:
- Sat-Nav
- Reverse camera
- Media Player
Secondary Functions:
- Proximity sensors
- Dash Cam
- ECU Interface
- Wifi / Satellite connection
Hardware:
- Raspberry Pi 4
- 7″ Touchscreen
- Neo 6M GPS Module
- x2 USB Camera or
- future development: ultrasonic sensors, ODB2 Interface, USB HD and Sim module
Software:
- Navit (sat-nav)
- mplayer or OpenCV (reverse camera)
- Qt5 – PyQt5 – GUI (software management / Interface)
- custom code (Python, C/C++)
The project will be installed on board of the Sprinter Campervan (still looking for a good name… ! ) and will be called Navigator, inspired by the movie Flight of the Navigator, 1986.
Some parts have been developed, some still on going, other still on planning. I will post updates and full tutorial for replicate the project.
All related post can be found inside the Navigator category.